This is the main landing page for the "Cripplepunk My Wheelchair: Karman LT980 (Aradia)" series. See all posts that reference this chair or view the Table of Contents below. Note the series is still being written & posted.
In another life I was in an associate's degree program for Occupational Therapy. I didn't finish field work, but I did finish all my OT-specific classes. The sicker and more disabled my friends and I get, the more I find myself using those skills and thinking patterns for my own benefit.
One of those projects has been to slowly modify / adapt an extremely basic hospital chair/transport wheelchair that I inherited from a friend. The modifications started when they owned the chair, but I have to continue them in order to make the chair usable for me.
When looking into what others have done to make their basic Amazon or drugstore wheelchairs more functional, I saw that people linked
this post by Erik Kondo / Open Source Wheelchairs over and over. I love Open Source Wheelchairs / DIY Wheelchair Supply, and my new wheels that went on this chair come from DIYWS! However, his post is not super instructional for me, and as someone with very little starter wheelchair experience or knowledge, I found I had to back up and do a lot of other basic stuff first.
I also found that some popular reddit posts also talked a lot about hardware store trips, power tools, and the like. I have had no income for most of the last three years. My skills also lean way more towards the DIY adaptations and
summer camp chaos crafting, and you will absolutely see that in the work I do. I also found that a lot of blogs and forum posts are discussing adaptions for chairs that are already more ideal than my own, which made some really interesting design choices; and that I received as a hand-me-down, so I had no input on the initial specs.
I am
disabled and living in poverty, but also an
anarchist witch and crafter, and I refuse to let capitalism deprive me of a tool I desperately need as a
person with moderate to severe myalgic encephalomyelitis. So
I have assumed the risk for my DIY modifications, and I am not giving you medical advice.I don't recommend doing everything the way I do it. In fact,
some of my mods are definitely unsafe compared to ordering the correct part (i.e. anti-tippers) and just installing that as instructed.I decided to document my process for my chair in case someone else stuck with a less-than-ideal chair may benefit from the things I learned! Please leave comments here or on any of the forthcoming posts if you have questions I didn't answer.
I am still actively writing the step-by-step posts, so bookmark this main post or check my blog periodically for the next pieces of the write-up!h
The Insufficient Chair
( Read more... )The Modifications
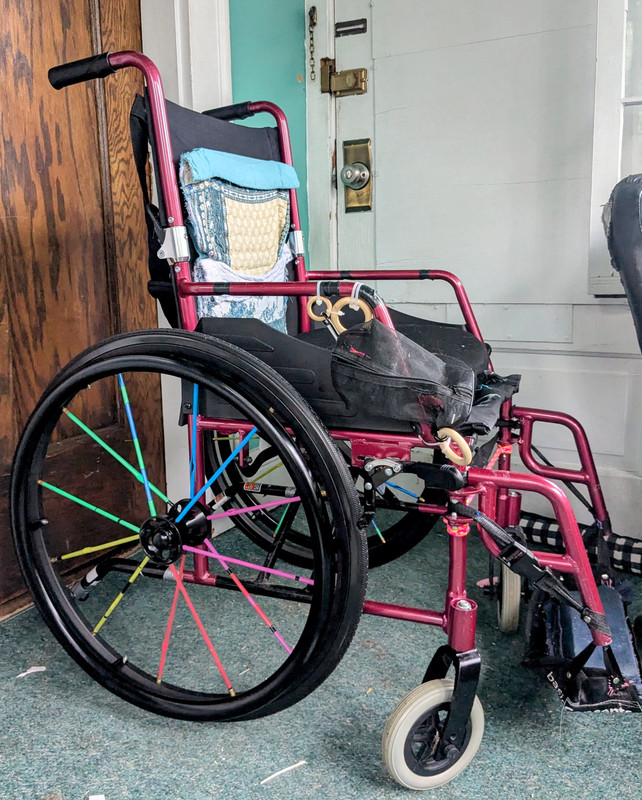 Aradia, with all her updates as of 25 July 2026
All my modifications have been made to be undone so that the chair can be reset to its old factory self (although I'm not 100% sure where the original footplates are) and/or the pieces can be repaired or replaced. I hope to get a custom chair eventually and to be able to hand this chair down to someone else in my community who may be in need of one!
All mods so far have retained the chair's ability to fold.
I'll do my best to
list materials needed in each modification, though please note that your theoretical chair is not my chair, so you may need different tools if you try something similar. That said,
this process would have been pretty impossible without a basic socket set & some wrenches. Listing specific gauges probably won't be helpful unless you're buying & using the exact parts we are on the exact chair model, but
I will mention size when I've learned it's a wheelchair standard of some kind, i.e. common between many chairs. This will make more sense especially when we talk about wheels & axles.
The Steps
Here are the modifications I have made for my chair, in a kind of combination of the order I made them and the order it would have been most convenient to make them. The post will cover the most optimized version of the solution/s I found, even if it took me several tries. I'll do my best to mention if I want to improve my process or if I've thought of alternative methods I didn't use, just in case that's helpful!
Each of these will be its own post with images. I didn't always document my process very thoroughly but I will make an effort to go back and take photos.
0.
De-branding1. Basic maintenance after inheriting the chair and adjustments for proper positioning, including treating the casters for a "shopping cart" flutter
2. Added a removable cushion.
3. Problem-solved some incorrectly ordered anti-tippers with duct tape & pliers (safer than it sounds, I promise)
4. Modified a fabric foot sling into a more solid foot plate for better posture and support
5. Added a removable backrest support
6. Some routine maintenance & small fixes
7. Upgraded to 24-inch solid rubber wheels with ergonomic (oval) push-rims from DIY Wheelchair Supply
More on all those processes can be found in the linked posts. As this is my masterpost of modifications, I'll update it as a Table of Contents for completed modification and for my next step plans!
Next Steps
( Read more... )
Next Post: Basic Maintenance (Round One)
Being drafted
If you have any questions, leave them here or on any subsequent CPMWC post—I'll address them in an FAQ/Things I Missed if I get enough of them, or just answer you in the comments & edit the relevant post to include your info!
Happy Disability Pride Month!
♥ Crash
![[personal profile]](https://www.dreamwidth.org/img/silk/identity/user.png)


